Setup DNS Relay on Router: A Comprehensive Guide
DNS Relay, also known as DNS Forwarding, is a feature that enables your router to act as a DNS resolver, forwarding DNS queries from clients on your network to external DNS servers. This setup allows you to manage DNS traffic on your network, providing an additional layer of security and control over your internet traffic.Benefits of Setup DNS Relay on Router
Configuring DNS Relay on your router offers several benefits, including: * Enhanced security: By managing DNS traffic, you can block malicious websites and protect your network from DNS-based attacks. * Improved performance: By using a local DNS resolver, you can reduce the load on your network and improve overall performance. * Centralized management: DNS Relay allows you to centralize DNS management, making it easier to configure and manage your DNS settings.Best Practices for Setup DNS Relay on Router
Procedure for Setup DNS Relay on Router
To set up DNS Relay on your router, follow these steps: 1. Log in to your router's web-based interface. 2. Navigate to the DNS settings or advanced DNS settings. 3. Select the DNS Relay function or Enable DNS Forwarding. 4. Configure the DNS server IP address or IP addresses. 5. Set up the firewall rules to allow DNS traffic. 6. Configure the DNS client to use the router as a DNS server.Router-Specific Setup
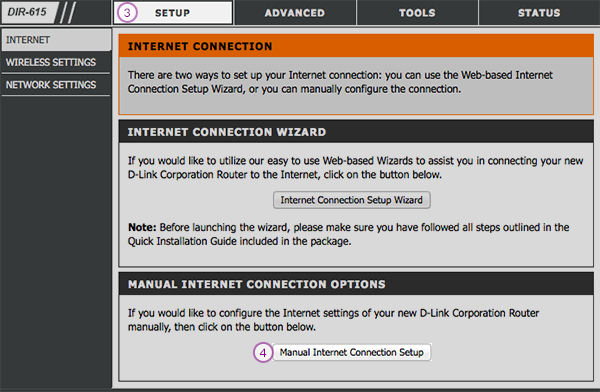
Furthermore, visual representations like the one above help us fully grasp the concept of Setup Dns Relay On Router.
The specific steps to configure DNS Relay may vary depending on your router model and manufacturer. Here are some example setup procedures for popular router models: * **D-Link Routers:** Go to **Setup** > **Network Settings**, then select **Enable DNS Relay**. * **NETGEAR Routers:** Go to **Advanced** > **Setup**, then select **DNS Settings** and enable DNS Forwarding. * **Linksys Routers:** Go to **Advanced** > **Setup**, then select **DNS Settings** and enable DNS Forwarding.


 - GeeksforGeeks")


