Change Wi-Fi Router Password: A Step-by-Step Guide to Boost Network Security
Why Change Your Wi-Fi Router Password?
- Prevent unauthorized access to your network and devices
- Protect your personal data and online activities from hackers
- Boost your network's overall security and performance
- Prevent data breaches and cyber attacks
How to Change Your Wi-Fi Router Password

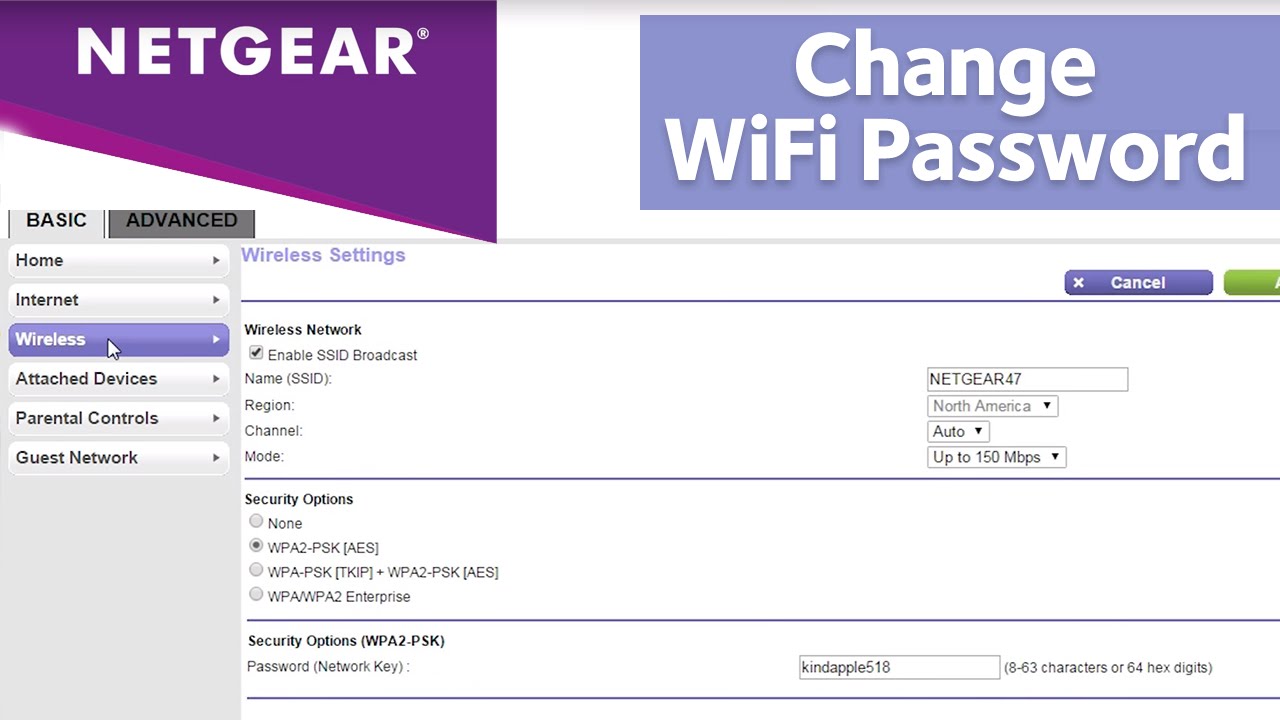
Changing your Wi-Fi router password is a relatively straightforward process that can be completed in a few easy steps. The process may vary depending on your router's manufacturer and model, but here's a general guide to get you started:
- Access your router's admin panel: Open a web browser and type the IP address of your router (usually 192.168.1.1). Enter the default username and password to access the admin panel.
- Navigate to the Wi-Fi settings: Look for the Wi-Fi or Wireless section on your router's admin page. This is where you'll find the settings to change your Wi-Fi network name and password.
- Change the Wi-Fi network name (SSID): Enter a new name for your Wi-Fi network that's easy to remember but hard for others to guess.
- Change the Wi-Fi password: Enter a strong and unique password that includes a mix of uppercase and lowercase letters, numbers, and special characters.
- Save and apply the changes: Click the "Save" or "Apply" button to update your router's settings.
Tips and Tricks to Keep Your Wi-Fi Network Secure
- Use a strong and unique password: Avoid using easily guessable passwords like your name, birthdate, or common words.
- Change your password regularly: Update your password every 60-90 days to maintain network security.
- Use WPA2 encryption: Ensure your router uses WPA2 encryption, which is the most secure encryption standard available.
- Use a guest network: Create a separate guest network for visitors to prevent them from accessing your main network.
- Update your router's firmware: Regularly update your router's firmware to ensure you have the latest security patches and features.


![[Wireless Router] How do I enter my ASUS router's setting page using ...](https://i.ytimg.com/vi/ThwFrQ7cmEI/hqdefault.jpg "[Wireless Router] How do I enter my ASUS router's setting page using ...")

")


![Picture of How to Change the Password on a Comcast (Xfinity) WiFi Router? [Easy Steps]](https://2.bp.blogspot.com/-HEV24fWQLos/WHnAit3OrvI/AAAAAAAAKZ8/WE19b88aO2IFgOrnZENMqtIKOfaTP_ITACLcB/s1600/PLDT%2BWiFi%2BPassword.jpg "How to Change the Password on a Comcast (Xfinity) WiFi Router? [Easy Steps]")


")


")